
The best way to keep a project at Doejo moving along is to establish the client’s needs and provide reasoning behind every step of our process. During Doejo’s new workshop series, our dev team provided these tips for a smooth development:
First Steps
- Plan – Spend time planning internally to make later steps with clients faster. This could save hours of pain in the future and make later steps more efficient and fun.
- Show your work – Keep the client involved by showing your progress along the way, from logo ideation to design comps.
- Consult developers – Even though they may come down the pipeline, keep the development team in the loop with the product or site’s plan, whether it’s technical or dealing with functionality.
Information Architecture (IA) and User Experience (UX)
- User stories – Generate user stories/ scenarios of what a person may visit the site for. These can be taken from the kickoff meeting.
- User personas – Create user personas based off of your target customer (these are not always necessary, but help give an idea of who the site is being created for).
Build a Skeletal Frame
- Information flows – Use wire frames to show how one might navigate the site or product.
- Form flows/ sitemap outline – Start with simple, bulleted lists. You can also include user stories. Make sure to consult with a developer for functionality.
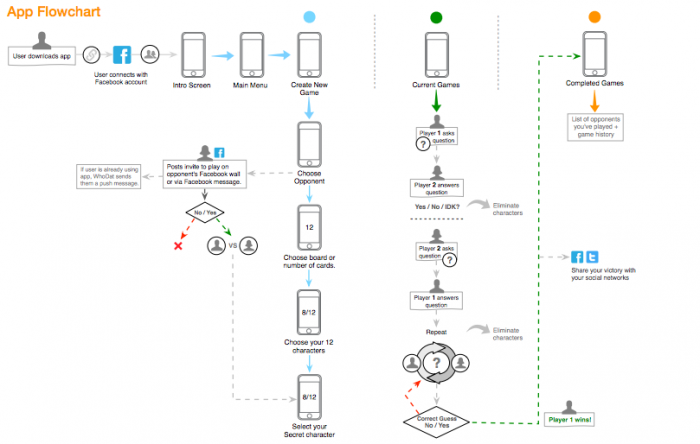
- Decide to use a flow or sitemap (for a linear, simple or a brochure site) – For a complex app with many paths, a user flow diagram is best. You can even overlay user personas on the sitemap to show where they go.
- Review sitemap/ flow with developer – Use wireframes and keep them lo-fi, simple and fast. Make sure to cover everything from your sitemap.
- Show interactions – Show what happens when a user clicks on something. And, of course, review wireframe interactions with the developer.
- Info extras – Have a conversation with the client and find out how they describe their brand, as well as what image they want their brand to have. Even ask the client what customers have said about them.
Art Direction
- Brand attributes– Narrow the description down to three words that describe the company. The design will be centered on these words, so choose them carefully.
- Visual attributes – Discuss what visual attributes the client wants in order to help them visualize the look you are going for.
- Logo concepts – Draw from brand and visual attributes to create logo concepts. Make sure not to show too many or too few ideations (3-6). To add variety, show two of your favorites and two of you least favorites. Make sure the client is focusing on the logo concept and nothing else; use black and white images so as not to distract from the core design.
- Colors – Look back at your brand and visual attributes to make color choices. Don’t show too many options. Allow for changes during the art direction stage, but don’t lock yourself into a color that may not work.
- Inspiration sites – Highlight specific portions of other sites and explain why they work. But also explain how it can work for the client’s needs.
- Art direction – Create a guide that represents the style based on brand and visual attributes for consistency going forward.
- Hi-fi mocks – Use layer compositions and keep your PSD’s and/or vectors organized. Don’t forget to review with the developer.
